Connect Shopify
Written By Max
Last updated About 1 month ago
Many of our customers use Shopify for their online stores and as a POS. We understand the importance of seamless operation and item management, which is why we are a Shopify partner and offer direct integration with Circle-Hand.
Step 0: Create Shopify account
Create an account (Shopify Basic with POS Lite is sufficient for many stores)
Download Shopify POS for your smartphone or tablet (Apple / Android)
(optional) Get a Shopify card reader or a third party card reader like SumUp or Clover. You can also use tap-to-pay via your smartphone to accept card payments
Here is a video tutorial on how to setup Shopify POS with Circle-Hand for the first time.
Step 1: Connect Shopify
Click here to download the Circle-Hand Shopify app.
Please make use the same email in Circle-Hand that you use for Shopify (you can change it later)
After you installed Circle-Hand you see the calendar in Shopify, you can go back to Circle-Hand: https://next.app.circle-hand.com/
Step 2: Synchronizing Product Data
Once the Circle-Hand App is installed in your Shopify store, all items are synced to Shopify.
Items sold in Shopify will automatically be marked as "Sold (Payout Pending)" in Circle-Hand.
Updates to existing items in Circle-Hand will also be reflected in Shopify. If you edit any attribute in Circle-Hand, it will push all attributes and tags to Shopify instantly.
Price, Compare-at-price, discounts and title sync from Shopify back to Circle-Hand, but it’s recommended to do all item edits in Circle-Hand.
Data Field Mapping
The synchronization of product data follows this mapping:
Title: Used as the product title on Shopify.
Images: Used as the product images on Shopify.
Price: Synced with the price field in Shopify.
Brand: The brand name is stored in the 'Vendor' field in Shopify.
Category: Synced to the product type in Shopify.
Category (Shopify): Synced to Shopify category.
Description: Synced to the product description in Shopify, retaining all rich text formatting.
Barcode: An item's barcode is synced with the barcode field in Shopify. You can activate to sync the barcode to Shopify SKU as well.
SKU: Synced to Shopify SKU.
Publish Status: ‘In-Store only’ will push the item to Shopify POS, ‘Store + Online Shop’ will push the item to Shopify POS and Online Store.
Note: If you change an item in Circle-Hand to status Pending, Returned to client, Collected, Donated or Discarded, it will automatically change the sales channel to POS only.
Compare At Price: Syncs to compare at price in Shopify. Many shops enter the new retail price of items.
Deletion of items: If you delete an item in Circle-Hand, it will delete the item in Shopify as well.
Using Tags
You can choose to activate or deactivate the option to send item attributes as tags by going to Settings → Shopify → “Send Attributes as Tags.” When activated, all filled-out fields during item creation will be sent as tags in this format: CH-attribute-entry. For example:
CH-color-[entered color], so the tag in Shopify will be ‘CH-color-green’
You can deactivate the CH-prefix in settings > Shopify to send e.g. ‘Green’ instead of CH-color-green’
Custom metafields and tags
If you activate in settings > store > attributes ‘Custom Tags/Metafields’ you can add custom tags per item, e.g. ‘Archive’ ‘Spring2026’.
In addition, you can add your own metafields via settings > store > custom attributes. If you add an attribute called ‘Origin’ it will sync to Shopify as custom.origin- this way you can use your original metafields in Shopify. Make sure they are defined as single line text.
Metafields for Added Flexibility
The easiest ways to define metafields in Shopify is to create an item in Circle-Hand with all attributes you want to define. After, you can define them in Shopify.
The following metafiels can be defined as Single line text:
circle-hand.color
circle-hand.size
circle-hand.material
circle-hand.condition
circle-hand.gender
circle-hand.brand
circle-hand.location
circle-hand.age_group
circle-hand.seasons (note with s at the end)
The following metafiels can be defined as Multi line text:
circle-hand.measurements
circle-hand.season (note without s at the end)
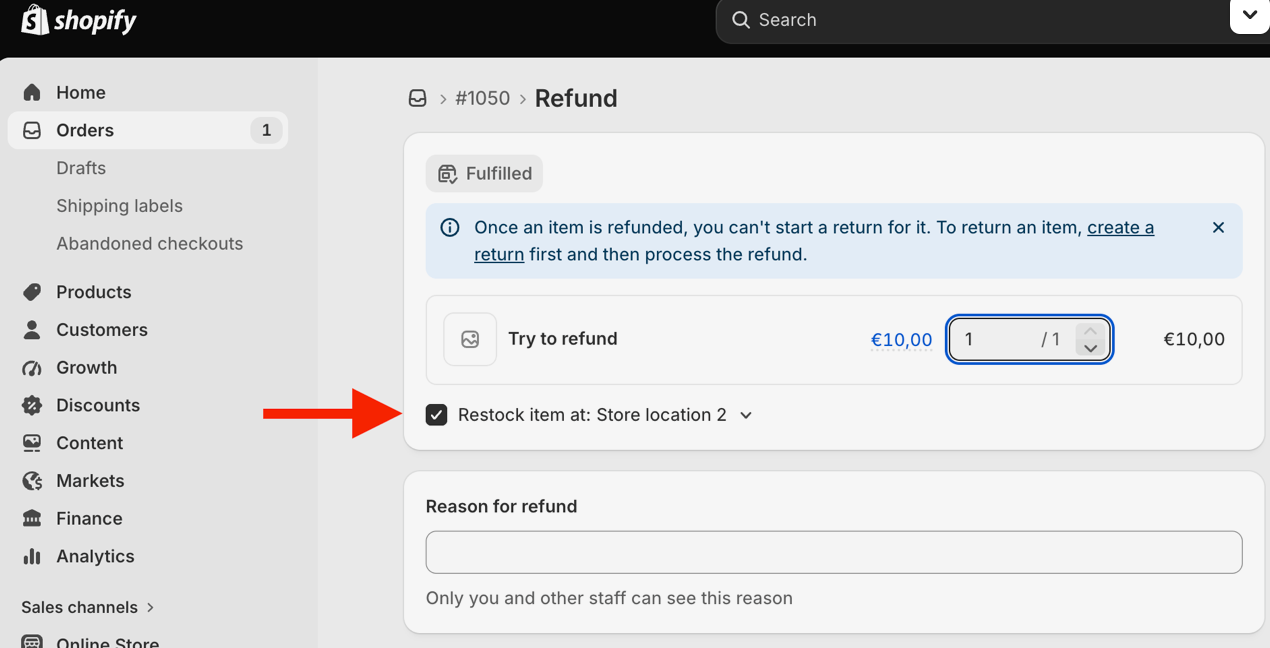
Step 5: How to sync refunds from Shopify
You process the refund via Shopify POS or Online, this will automatically sync back to Circle-Hand. Just make sure to activate that checkmark:
Step 5: Multi-location setup
In Circle-Hand settings > Store > Locations, you can map store locations with Shopify locations.
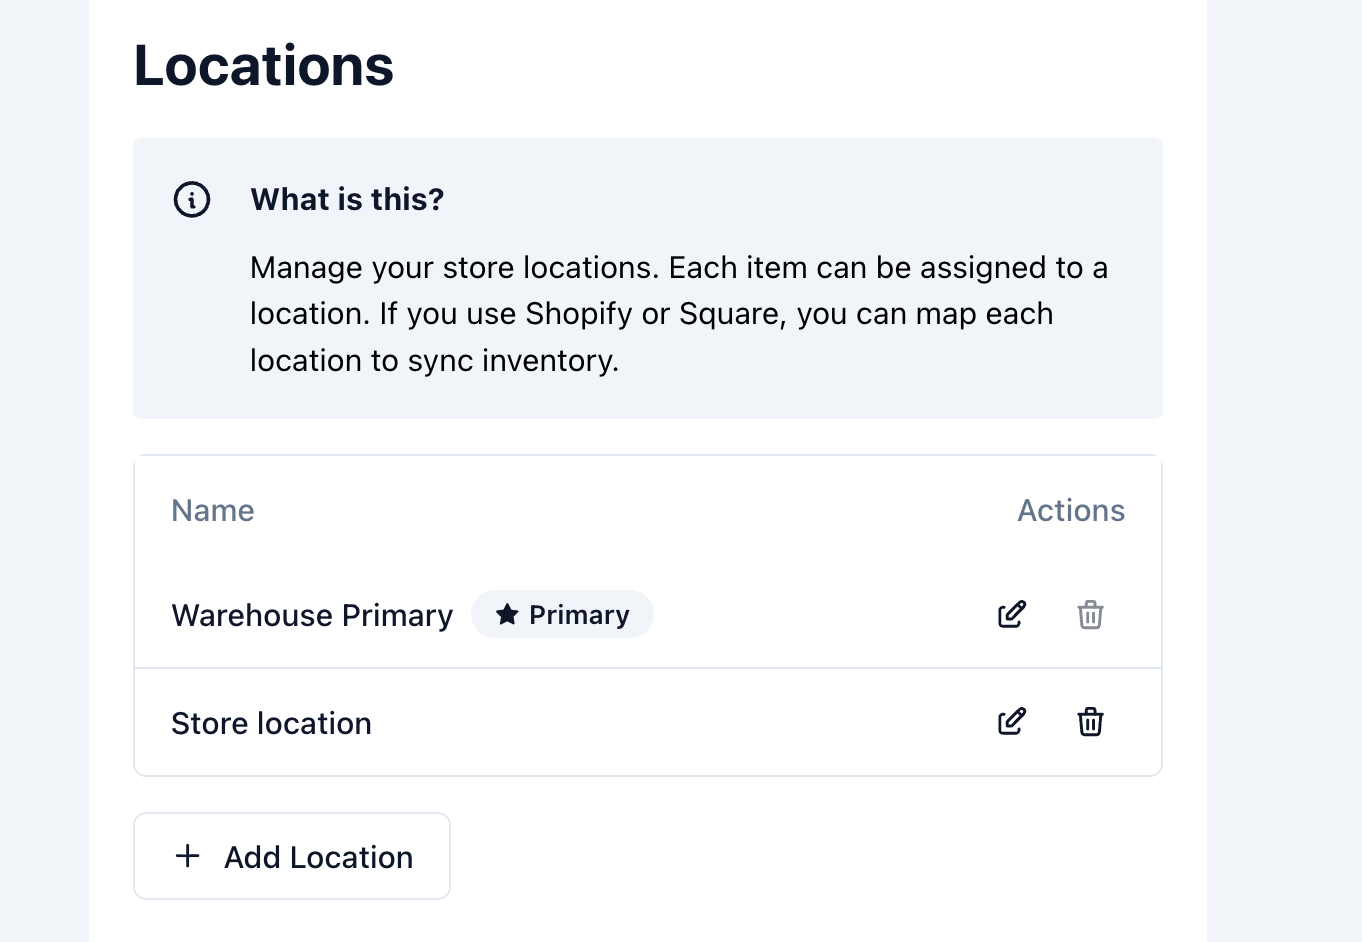
Activate in settings > Store > Attributes > ‘Store Location’ so you can change the location per item. You can update an item's store location in two ways:
Bulk edit: Use the barcode scan feature in Circle-Hand > Manage > Bulk Edit ‘Store Location’ to update multiple items at once.
Individual edit: Change the store location on a single item directly.
Important: Using Shopify POS Locations
If you move an item to another Shopify POS location, update the store location in Circle-Hand too. Why: If you sell the item without updating its location first, Shopify will show:
-1 at the new location (where you actually sold it) and +1 at the original location (where it's no longer physically located). The item may then still appear as available on your website, even though it's already sold.
If you prefer to sell at a different Shopify POS locations without changing the location, make sure to: (1) If you use collections in Shopify you can add the condition "Inventory greater than 0". Shopify collections calculate inventory across locations, so +1-1 = 0, it will then no longer be visible online or (2) Use Shopify Flow to automatically remove -1 inventory from your online store.
Was this helpful?
Still need help? Ask the team